Showing posts with label Recipes. Show all posts

Sunday, March 25, 2012

Currying Flavour - Beef Curry and Trimmings

Beef Curry with Rice, Dhal and all the trimmings
I've been asked to share my recipe for Beef Curry over on Facebook so I thought the best way is to post it for posterity on my blog! This way everyone can enjoy it and it'll link to Twitter and Facebook. I have a really simple approach to curries - don't be a curry snob is the starting point and then it's straightforward after that!

I lived in Bangladesh over 30 years ago for over 2 years as a young Concern volunteer and that was the start of my love affair with kari or what we know as curry. (Along with another love affair but that's a whole 'nother story!). Ireland in the '70s wouldn't have been a hotbed of exotic epicurean delights and we were just about getting used to yoghurt and pasta as fancy foreign food, so for me going to Asia and encountering Bangladeshi cuisine was a real eye-opener. I got to love the food, the lack of spuds didn't bother me too much as I adored the rice staple, either boiled or fried as Biryani, and there was the added bonus that I lost 2 stone (about 14kg) in the first three months there from a combination of amoebic dysentery and a healthier diet with lots of rice and delicious fruit.

This paradox is quite explainable as I had a steep adjustment to make in relation to building resistance to bugs in water and the environment and I'd say all us sensitive Irish nurses and teachers and engineers and agriculturalists had to cross that Rubicon! Once we got over the first nasty dose we were pretty well assured of cast-iron constitutions for the duration of our stay - which was just as well as I loved street food and lassi and just got sense, with the  maxim "boil it, peel it or forget it" as my mantra. The joys of tropical living were myriad and I've just touched the surface. Another time I'll tell you about the skin problems, the filaria risk and the general day-to-day hazards of daily life in such a challenging climate.

Curry bash at Martin's Oz send-off - a big hit with the lads!
Back to the curry. I fixed on this beef curry a few years ago and it is a big hit with everyone, family and visitors alike. I make it a day before serving as like any decent stew it benefits from standing for a day or so. Think back to your student flat days when the stew made on Monday lasted through to Thursday (or made on Sunday if you had a good Irish mammy and could do some home shopping!) The rice has to be Basmati - I use Lidl or SuperValu Basmati Rice as the cheapest and best. Again no need to be a rice snob either.

Perfect Beef Curry

Ingredients
  • 2lbs/1kg stewing beef (with some fat marbling or trim to give it extra flavour)
  • 2 onions - slice thickly
  • Some garlic - 2-3 cloves
  • Patak's or Sharwood's sauces - I use a mix of the following with 3 tablespoons of three of the following - a combo of mild and medium. I mix the flavours quite randomly and find a combo is better than a single sauce. Totally unscientific and probably give the Patak family the vapours, but it works for me. 
  • Mild = Tikka or Tandoori or Korma; 
  • Medium = Rogan Josh, Jalfrezi or 
  • Hot = Madras, Vindaloo.
  • These last two are for the foolhardy who think they can handle hot curries. You've been warned!
  • 1 can (400g) of chopped tomatoes
  • 1 can (400g) of Coconut Milk
  • Tablespoon of Mango Chutney (optional)
  • Tablespoon of vegetable oil
  • Optional Extra: Dried spices - a teaspoon of each of the following can be fried in hot oil before adding the sauces and meat.
  • Garam Masala
  • Cumin (seeds or powder)
  • Coriander (seeds or powder)
  • Mustard seeds
 Method
  1. Put oil in heavy base saucepan - heat to smoking hot.
  2. Add dried spices if using and stir for a minute but don't burn them.
  3. Add the sauces as in 4 above.
  4. Add the meat and onions and garlic and mix well.
  5. Brown the mixture but again don't burn - turn down heat as it will stick if you're not careful.
  6. Add tomatoes and coconut milk and mix well. 
  7. Cover and turn down to simmer, stirring occasionally, for 3-4 hours. 
  8. It's done when the meat is so tender to be falling apart when you cut it. 
    Last family curry - Martin's going-to-Oz party
You could use any quality sauce you can get locally - Patak's and Sharwoods are the commonest avaiable here. I'm sure there are specialty shops where you can get any variety of sauces. I use sauce in preference to dried powder as it gives more intense flavour and they are pretty oily and infuse every pore of the meat.The secret is to add the sauce to the meat before browning it - no point in searing the meat before the flavours can permeate the fibres. There's my science bit for you.

Serve with freshly boiled Basmati Rice.

Perfect Basmati Rice.
NB: I don't do any of the things you should do with rice like washing it or soaking it.
Put 200-300gm rice in heavy base saucepan.
Cover with boiling water to about double the volume of rice - ie. if rice quarter fills the saucepan then add water to half fill the saucepan.
Add a tablespoon of vegetable oil - I use olive oil - and stir through.
Cover and bring to the boil; when rolling, stir again and turn off heat.
Leave on stovetop for 10-15 mins and steam will cook it through dry and perfect. No need for rinsing, draining or anything. Just stir to separate and serve. I use this rice for making fried rice dishes like Nasi Goreng another family favourite for midweek fast food dinners.


Side dish - Garam Masala Fried Eggplant (or Aubergine) - Brinjal
Fried Eggplant
  1. Slice eggplant.
  2. Sprinkle with Garam Masala (a blend of sweet spices - a store-cupboard essential!)
  3. Heat oil in heavy base frying pan to about 0.5cm depth to smoking
  4. Add eggplant slices and fry in hot oil, turning after a few minutes.
  5. When golden brown on both sides remove from pan and drain on kitchen paper (it's pretty oily as the eggplant absorbs a lot of the oil - don't even think about calories!)
  6. Eat with the curry - it's delicious.

Any other side dish like Raita (yogurt with thin slices of onion or cucumber and sprinkled with garam masala or cumin) or sliced banana or just a green salad with chunky beefy tomatoes. Chappatis or Parathas are also delicious Indian Flatbreads to serve with curry and they are the mopper-uppers of the juices as curry is best eaten with no cutlery but with the fingers. Try it sometime - have a bowl of hot water with a slice of lemon on hand to cleanse your hand afterwards.

Enjoy! Ask me anything I didn't explain properly and I'll try to help.


Monday, January 31, 2011

Slow Cooker Crockpot Casserole - Comfort Food for those January Blues

The 30-year old Tower bible!
Today I made a nice beef casserole in my Slow Cooker which is fantastic. I love it, and it is great when I'm going out for the day.I went to Cork to visit son Shayne, fiancée Jany and granddaughter Sofia who's almost a year. Where did the time go?

I had been to Dublin yesterday for a meeting and visiting friends and middle son Martin afterwards, and travelled up and down with another friend who was meeting her daughter in Dublin, so it's been quite a weekend.  When I came home tonight - dinner was ready. I just had to do the spuds (for teen daughter and me) and heat some rice for hubby, and that was that. No pressure.

Lovely colourful warm stew
Pre-fry everything if you have time - no worries if not!
I made my own combo of about three different recipes and it turned out lovely - I used a beef stew base but as I had some pork I added that, with seasoning from another recipe in a Slow Cooker book I have. It's great comfort food for the January blues.

We got our Slow Cooker as a wedding present nearly 30 years ago - it's a Tower and has a 2-litre capacity, so it's not enormous - but it's more than adequate for four-six people if they've got average appetites! I resurrected it in the past few months after years of not using it or only occasionally taking it down to see if it still worked, as a friend had been raving about hers. So I have enjoyed making some great comfort food with it. Today was great as I put on the dinner before going to Cork and when I came home about six hours later the dinner was done to perfection.

Beef and Pork Casserole with Mixed Vegetables

Ingredients

Finished dish
  • 500g/1lb stewing beef - cubed
  • 300g/12ozs pork chops/steak - cubed
  • 500ml/1pint beef stock (use a quality stock cube if no home made stock about)
  • 250ml/glass red wine
  • 6 chopped tomatoes
  • 3tbsp tomato puree/paste
  • 1 teasp. sweet paprika 
  • 1 teasp. hot paprika (optional - I use delicious smoked paprika from Spain, wonderful!)
  • 1 teasp. Allspice
  • 1 teasp. ground coriander
  • 1 teasp. mixed herbs
  • 1 tbsp fresh parsley chopped
  • 3 carrots - sliced
  • 3 peeled potatoes - diced
  • small turnip/swede - diced
  • 150g/6 oz button mushrooms - halved if big 
  • 2 onions - chopped
  • 2 cloves garlic - chopped
  • 2 Bay leaves.
    At the start of cooking

(These spices and herbs give it a lovely North African exotic flavour but it's still non-threatening to traditionalists who love their casseroles tasty but not fiery!)

Method
  • Preheat the Slow Cooker on High for about 30 mins. 
  • If you have time, brown the  meat and onions and garlic in a little oil in a pan. This gives a bit of extra flavour to the dish. 
  • Add all the other ingredients and mix well.
  • Transfer to the warmed Slow Cooker and mix well.
  • Cover and cook for 4 hours on High, or if leaving all day turn it down to Low after a half-hour or so, and cook for around 7 hours.
  • If you leave it longer don't worry as you can't burn the food or do too much damage as it doesn't really overcook. 

Handy Hint: 
Cut root vegetables smaller than you might for a stovetop dish as they take longer than the meat to cook to soft. Nothing worse than hard potatoes in a casserole! So ensure you leave enough time to thoroughly cook them. I assure you 4-5 hours on High was enough to cook them through for me.

Enjoy with boiled Basmati Rice or for the ultimate in comfort food - mashed potatotes. I used Rooster spuds with lots of butter, a little milk, sea salt and freshly ground black pepper. Hard to beat it, worth a try. Hope you enjoy it and don't be put off by the long list of stuff you need. It's mostly in your kitchen cupboards.


Nearly gone!
Ready to go!

Monday, November 29, 2010

Snowvember Comfort Food - Variations on a Theme of Chicken Stroganoff and Apple Cake

The view from my bedroom this morning
Yesterday we had our first snow of this winter - Snowvember as someone called it on Facebook (I'm lifting it for the post title but have no idea whose idea it is - I just like it!) - and it came out of the blue as we never expected to have such early falls. The temperatures have been sub-zero for a few days, barely rising to 1-2 degrees Centigrade by day and falling to -10 Centigrade at night - in some parts of the country at least. The UK has had a much  more severe spell of snowy weather with -17C in Wales last night. (For all the American readers - I'm sorry, I haven't a clue what these temperatures are in Fahrenheit without converting and as I only do that for recipes you'll have to bear with me and check out some widget somewhere or other that'll do the business for you!)

The garden from the sunroom at noon today
With all this in mind it was time for lockdown for the weekend. I am not even thinking about work tomorrow or how I will deal with that - we don't prepare for snow in Ireland so no snow tyres/tires, and no chains and no snowploughs - only salt and grit. That means only main roads get treated and the by-roads I travel in work will be left to Mother Nature. I hope to be around to report back later in the week!

So ratchet the central heating up to the max, get a good DVD for Saturday night and have a nice warming dinner. This offset the worst impact of our "blizzard" - in essence about three or four inches of powdery snow which didn't thaw as the temps are too low - and made us feel like Scott of the Antarctic.

Going outside prompted "I may be some time" comment from the wittier among us, and a trip to the hilly hinterland of Lismore, Ballysaggart on the foothills of the Knockmealdown Mountains, to collect teen daughter and her pal from a friend's house necessitated having hubby drive as I was too chicken to chance it.

The book - in Jamie's blokey style
It was hair-raising as there were patches of black ice and snow frozen on ice that were lethal and we were lucky not to skid into the ditch/side of the road. (Still have that argument with Dutch hubby over ditch/dyke. In Holland a ditch is full of water, here it's the hedge at the side of the road. I seem to remember writing about this last year during the "Big Freeze"!

I decided to make a new dish for dinner last night and went to Jamie Oliver's wonderfully back-to-basic home cooking book "Jamie's Ministry of Food" for inspiration. As I wanted a chicken one-pot dish with rice, I went for the Chicken Stroganoff with leeks and mushrooms and tweaked it a little. Normally I use chicken in curry, or in a tomato-based Spanish-style stew, or for fast food like Fajitas or just plain old Roast Chicken, which is one of my favourite and hard to beat for comforting winter Sunday roasts.

This chicken stroganoff was simple to make, and quite plain. I added garlic, mixed herbs and some non-MSG Season-All (a type of sprinkled BBQ seasoning from the Schwartz spice range, which are good quality with no nasty artificial stuff.) This gave it a bit of a kick and I think the original would have been just too bland for my and hubby's taste buds which have been primed by years of Asian cuisine to the upper end of the hot'n'spicy scale.

Just had a nice slice of the cake - yummy!
Today I decided to make a variation on another classic comfort food - Apple Cake. I had some pastry for a base which I baked blind (with beans weighing it down on greaseproof paper). I covered the base with sliced cooking apples, then sprinkled sugar and a light dusting of cinnamon, and then covered the lot with cake mix. I used Victoria Sponge - having made enough for buns as well, I used half to top the cake. I then decorated the top with Glacé cherries and pecan nuts, and popped it in the oven for 30-40 minutes. It is delicious with whipped cream or ice cream, as it is more a dessert than a cake, being quite moist from the apples.

Here are both recipes with some photos of each.

Chicken Stroganoff (Based on Jamie Oliver's recipe)

Creamy chicken stroganoff with leeks and mushrooms
Ingredients 
Jamie's recipe - click to enlarge pic
  1. Olive oil and butter knob (25gm/1oz) to cook
  2. 600gm/1.5lbs diced chicken breast
  3. 1 large leek, quartered, sliced and rinsed well
  4. 220 gm/half-pound sliced button mushrooms.
  5. 1 tsp. dried mixed herbs.
  6. 1tablesp. chopped parsley.
  7. 1teaspoon seasoning sprinkled over chicken - can be BBQ, Cajun, Season-All, try the Schwartz range or any good quality natural seasonings. 
  8. 1 glass white wine.
  9. Half glass water.
  10. 250 ml/half-pint single cream.
  11. Salt and Pepper to season.
  12. Half-tsp. paprika powder (optional - I wanted a bit of a kick).
  13. Small squeeze of lemon juice (optional - add at end if wished).

Method (varies from Jamie's but I like to brown the chicken first).
mmmm, dinner!
  1. Sprinkle seasonings and dried herbs on chicken, heat oil and butter and add chicken. 
  2. Cook stirring well over high heat until browned all over. 
  3. Add leeks and mushrooms and cook for a few minutes, stirring to prevent sticking.
  4. Add wine and water, chopped parsley, salt and pepper to taste, cover and simmer for 10 mins. 
  5. Add cream, simmer and stir, reduce if liquid is too thin, but no need to add roux or any flour thickener.
  6. A delicate and tasty flavour, this is delicious served with Basmati Rice and Garlic Bread!
 Apple, Cherry and Pecan cake

Pastry for Base (Standard sweet shortcrust pastry used on numerous other recipes in this blog)

before baking - apple mix in pastry case
 Ingredients 
  1. 1lb/450gm plain flour8oz/225gm chilled butter (preferable to margarine).
  2. 2 oz/50gm sugar (or caster sugar or icing sugar) - optional if sweet pastry desired - otherwise omit.
  3. 1 egg - optional if you want rich shortcrust pastry - otherwise omit.
  4. A few tablespoons of cold water to bind.
Method:
Ready for the oven
  1. Add butter to flour, chop up with knife and rub in with fingers to crumbly texture.
  2. Add sugar and egg (if using) and water to bind stiffly.
  3. Minimally handling, knead lightly on floured worktop/table.
  4. Roll out enough pastry to line a deep pie/flan dish.
  5. Bake blind - put dried beans on greaseproof paper on top of pastry base.
  6. Bake for 10 mins at 200C/390F, then lower heat to 150C/300F and remove beans and paper, bake further 10 mins. Cool.
Finished Apple, Cherry and Pecan Cake
Victoria Sponge Cake Mix
Ingredients 
  1. 4oz/100gm flour (self-raising or plain with 2-3 teaspoons baking powder)
  2. 4oz/100gm sugar
  3. 4oz/100gm butter
  4. 2 eggs
  5. Almond or Vanilla Essence (as preferred)
Method
  1. Put all ingredients into mixing bowl and whisk together, if using electric whisk. 
  2. Otherwise, using a wooden spoon, cream butter and sugar well, add essence and beaten eggs and flour and baking powder (if used) alternately until a dropping consistency is reached. 
  3. Add a little boiling water to get right consistency.
Filling

2- 3 Cooking apples peeled and sliced - lay on base of cooked pastry case
Sprinkle sugar liberally on apples, then cinnamon.
Cover with Victoria Sponge cake mix
Decorate top with whole glacé cherries and whole pecan nuts as wished.

Bake in preheated oven 200C/375F for 15 mins, reduce heat to 150C/300F for another 20-30 mins or until firm and golden - watch out it doesn't burn - if edges done before centre move down a shelf and cover with greaseproof paper - loosely.
Cool on wire rack and dust with Icing Sugar.
Delicious with Ice Cream or Whipped Cream

Note the absence in this post of any mention of economic meltdown, national humiliation bailouts and selling out to the IMF/ECB, or street protests. These will have their day as I am very angry about the state of the nation and the mess our incompetent so-called leaders have left us with as we face down an early General Election in the New Year. But for now - time to be happy and eat well!

Thursday, November 4, 2010

Comfort Zones - Chocolate Pecan Brownies and Peachy Socks

Brownies ready for the oven - Pecans and 70% Chocolate
Yesterday I was perusing blogs and came across this decadent-looking recipe over on Brownieville Girl's foodie blog and thought - I've got all the stuff in the kitchen - so I got stuck in straight away and made them. I have to confess I  hadn't made brownies since we lived in Africa over 15 years ago as I am not that mad about rich chocolate cakes - but then I have eaten some delicious brownies over the years and they are quite different from chocolate sponge cake.

Mixing the Brownie Batter with the pecans
Firstly they are so concentrated and dense that you only need a small one to feel satisfied and full (she tells herself!); secondly, they are totally different in texture and have a moist centre with a slightly crunchy outside; and finally what clinched it for  me was seeing a brownie in the coffee shop we went to for lunch yesterday that cost €1.50 - and that was not much more than a mouthful.

Cheapskate that I am it kills me to see such prices for what's basically a slice of a tray-bake, in the same way that my inner Scrooge baulks at paying €1.90 or €2 for a cup of hot water with a teabag. I do enjoy going for lunch with my colleagues and a couple of times a week we meet up - but mostly I bring lunch with me and have it in the tearoom at work with an endless supply of free tea from the Burco boiler!
Ready steady bake!

I decided to experiment with these lovely brownies to bring them into work to share with my colleagues in the tearoom. They could be my guinea pigs, as they have shown themselves adept at sampling my other experiments, be they Anzac cookies or plain old Apple Tarts. They were very happy to do so and the brownies vanished like the promises in a political manifesto after polling day.

Here's the recipe from the Brownieville Girl Blog with full credit to her for sharing it with us - you can also link to her recipe post here.
(I am not familiar with cups but I used a cone measure which has cups on it and that helped, along with our digital scales)

Brownies (Courtesy of Brownieville Girl) with Pecan Nuts
Brownies cooling down - cut into squares
(my variation)
Adapted from Cooks Illustrated

Ingredients
Ready with the cuppa tea - or hot chocolate to go all out!
  1. 1/3  cup                cocoa
  2. 1 tsp                     instant espresso powder
  3. 1/2 cup + 2 tbsp   boiling water
  4. 2 oz (55g)            dark chocolate (at least 70%) finely chopped
  5. 2oz (55g)             butter - melted
  6. 1/2 cup + 2 tbsp  vegetable oil
  7. 2                          large eggs
  8. 2                          egg yolks
  9. 2 tsp                    vanilla extract
  10. 2 cups                 sugar
  11. 1/2 cup                brown sugar
  12. 1 3/4 cups           flour
  13. 1/2 tsp                 salt
  14. 6oz (165g)          dark chocolate (again at least 70%!) chopped into pieces
  15. 1 Cup                 roughly chopped Pecan or Walnuts (optional)
Method
  • Preheat oven to 180 C/350 F
  • Line a 9" brownie tin with parchment paper, or just butter it.  
  • You can also use a roasting dish/tin with parchment paper lining as I did.
  • Whisk cocoa, coffee and boiling water in a large bowl. 
  • (I used a saucepan for everything instead as I melted the butter and chocolate on the stove top)
  • Add 2 oz chocolate  and whisk until melted.
  • Whisk in the melted butter and oil.
  • Add eggs and egg yolks, vanilla extract and whisk until totally blended.
  • Whisk in the sugars until well incorporated.
  • Add the flour and salt and combine carefully with a large spoon.
  • Mix Pecan nuts or Walnuts thoroughly in mixture
Scatter the chocolate pieces over the brownie mixture.
  • Bake 30 - 35 minutes - you know how to check it's right!
  • Allow to cool for 1 1/2 hours and then cut into nice big chunks. (I used a Pizza Cutter)
I hope you like the photos - the chocolate I used was Lidl's Ecuador 70%, while the Cocoa was Green & Black's Organic Cocoa - a perfect combo! The whole thing took no time to make - I used a hand whisk as the mix is like pancake batter till you fold in the flour when it thickens a bit. No need for much elbow grease at all!

Cosy Toes in Comfy Boots
Peachy Pastel Lacy Socks

As for the peachy pastel socks - these were just too pretty to pass by. I found the pattern via Ravelry like so many others - they are also from the Fantasy Cascade range and I used DK yarn - 100gm ball of a lovely pale peachy colour that I'd bought in Buncrana in September - I got it as a baby wool but as I got two balls I have plenty leftover. The socks use about 65gms. I found the pattern easy-peasy once I got used to the repeat, every 16 rows. The pattern can be downloaded as a free PDF from the Cascade Yarns Fixation site here  You can see the pattern on the link about half-way down - W124 Fancy Feet - it's the middle sock of the three shown. 
(If you want to follow me on Ravelry I'm there as LismoreLady!)

Hanging out in the garden

The beauty of these socks I've been making is that they are actually very wearable and I am as snug as a bug in a rug these days with my new ankle boots and home-made socks keeping me warm and cosy. I got my new Clarks ankle boots in Shaw's in Dungarvan a few weeks ago - and they are a tad big for popsox or normal tights, as I wanted to have enough room for woolly ribbed tights or my knitted socks - and they work a dream. So the moral is - go a half-size up if you want that bit of space in your boots - especially if you try them on wearing popsox.

I think I'll be making some of these as Christmas pressies - maybe even as a blog giveaway when I get around to it - watch this space!

Meanwhile, happy baking and knitting to all!


New Boots with my Coral Socks


Heel and pattern detail of Lacy Socks

Sunday, October 10, 2010

Apple Jelly - autumnal delights in an Indian Summer

I am making Apple Jelly this balmy Indian Summer weekend and when I realised I didn't have the recipe on my blog I thought I'd better rectify that omission right away. I have made apple jelly numerous times over the past years with the exception of last year when we had a disastrous summer resulting in no apple crop - a total of six apples from our three trees!

This year has more than compensated, with a great harvest and lots of lovely big cookers on the trees - they are probably Bramleys, but I really don't know the variety as they are there forever.

My grandfather planted one or two of the trees in the 1920s as we found a letter from Power's Plant Nursery in Waterford from that era pricing apple trees. The third we know from family lore was transplanted from the local vet's garden back in the Twenties or Thirties; they were throwing out this tree and Granddad rescued it. It is the one nearest the house now and supports my clothes line on one of its dead branches. They are all quite wonky and one looks like it could tip over and probably need a prop one of these years. Another is so tall there is no way we can ever reach the top branches so rely on the wind to knock 'em off as literal windfalls.

Here are some photos of the trees for posterity. They have served us well over the years - I am making lots of apple tarts this year and bringing them to work for the teabreaks as I would balloon if I kept them all for home though I'll always have one on the go for visitors.

The house is quite quiet nowadays with only hubby and teen daughter and myself here - two sons in Cork and one in Dublin mean we're travelling at weekends to visit them and happy to do so but they don't come home as often as they did from college. So while I still channel my baking muse the beneficiaries are work colleagues and friends more than the family.

I haven't made apple jelly for two years now, of necessity, and still have lots of the last batch, which is perfect - "preserves" in name and nature! Home-made stuff doesn't have a sell-by or best-before date but with the jars sterilised before filling (in the oven) it means bacteria don't get a look-in. It's only when the jar is opened that you have to watch out, though it's very unlikely to go off in the lifetime of a pot of jelly, as it'll be eaten before mould can take hold!


A caveat for any newcomers to Apple Jelly - you need TIME! It has to be made over two
days or one day if you start stage one in the morning. That doesn't equate to lots of work - that's minimal and is perfect for an intrinsic lazybones like me - no need to prep fruit, only wash the apples.


Apple Jelly


Stage One - Ingredients

  1. 3 Kilos Windfall apples or any cooking apples in good nick - no rotten apples.
  2. 2 litres/3-4 pints water (no need for great accuracy here)
  3. Rind of lemon (use potato peeler to peel off, as you need rest of lemon later)
  4. A Jelly Bag. (Any cotton bag with handles or an old cotton pillow case will do - it's to strain the apple pulp and will stain horribly so nothing can be used for anything else ever again!)
  5. Two Kitchen Chairs (To hang jelly bag between the chairbacks)
  6. Large bowl or basin to catch the juice from the jelly bag.

Method
  1. Wash apples - no need to cut or core or peel
  2. Put whole apples in large saucepan or pressure cooker with water and lemon rind
  3. Bring to boil and cover
  4. Simmer or pressure cook for an hour/until completely pulped
  5. Mash up with wooden spoon or potato masher
  6. Carefully pour into the jelly bag hanging between the two chair backs with the basin on the floor
Stage Two - Ingredients

  1. Sugar
  2. Apple juice - obtained after pulp straining
  3. Juice of one lemon
  4. Cloves a few- optional if you like the flavour
  5. Measure a pound of sugar to each pint of juice obtained after straining overnight or until pulp no longer drips.
  6. (For Metric types - that's 450gms sugar to each 600ml juice)
  7. Jam Pots warmed in oven (put in cold oven and turn on heat to about 140C/285F so they warm gradually .
  8. (I use any clean glass jars with metal lids as they have a much longer shelf life than using cellophane jam pot covers as more sterile)

Method

  1. Measure Apple Juice into large pot
  2. Bring to boil
  3. Add measured sugar
  4. Add Lemon Juice
  5. Add cloves if desired
  6. Boil and skim off foam/scum that forms on surface - use a spoon
  7. Reduce volume by about a third and test occasionally for setting point - reached when jelly wrinkles if poured on a plate and left to cool.
  8. Remove jars from oven (careful now!) and turn off cooker - jelly shouldn't be boiling or you'll get tiny bubbles in it.
  9. Ladle or pour jelly into the warm jars, fill to brim, and cap immediately.
  10. Stand on heatproof surface to cool, and listen for the pop as the jars vacuum seal - the little button on most lids will pop in. That's your seal of guaranteed preservation!

Enjoy fresh baked crusty bread, real butter and just-cooled jelly - heaven with a cuppa tea!

Photos from the top:
  • Finished product - nicely labelled by hubby!
  • The three apple trees in the garden
  • Jelly bag hanging between the chair backs
  • Jelly pulp straining into basin
  • Pulp in bag
  • Juice after pulp strained overnight
  • Foamy scum when jelly boils after adding sugar
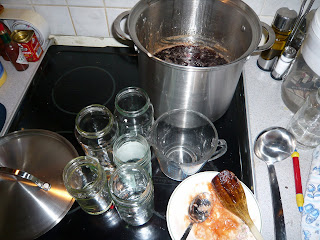
  • Ready to pot - warm jars, Pyrex jug and ladle, plate for testing setting point/holding foamy skim-off.
  • Payback time - bread and jelly, a cuppa and set jelly in dish!

Saturday, August 7, 2010

Just Desserts - having our Pineapple Upside-Down Cake and eating it

I hadn't made this in years until just over a week ago when I was heading to visit a friend in her mobile home in Clonea Caravan Park. My previous post here was on the howler road sign near the park entrance so it's fitting that the cake recipe follow.

It was a very pleasant evening with a group of friends and colleagues and we had a great laugh; it was one of those girly evenings that are just inexplicably enjoyable. Our hostess had laid on a lovely cold buffet - an assortment of delicious salads - which we enjoyed alfresco as it was a warm sunny evening. For dessert we all brought something to the table - including my Pineapple upside-down cake. It was eclipsed by a fab Pavlova laden down with fresh strawberries and raspberries nesting in the whipped cream, and a lovely Swiss Roll. I cheated a bit and bought along a tub of ready-whipped fresh cream on my way to the beach, as I didn't know if the caravan would have the wherewithal to whip cream and anyway it seemed like too much hard work for an after-work get-together.

As we were all driving home (except the hostess who was already home!) we passed on the wine which meant no sore heads the next day. Always a good thing on a weekday. The provenance of this recipe is an old Dutch magazine cutout - I have the original on a pulled-out page from a Margriet (I think 1988 or thereabouts - the date is obliterated) which is tattered and dog-eared, but as it lives inside one of my mother's old cookery books it will last another few decades. I used to make this frequently when we lived in the tropics as we had such delicious fresh pineapples - even from our own garden in some instances - and it's so simple that the ingredients were always to hand. Now I use the canned slices with the hole in the middle - you could use fresh but it's a bit of a lottery how they turn out - sometimes they are just right but often they are either underripe and hard or over-ripe and starting to rot in spots.


Hubby has a theory that I feel has some merit - that it's preferable to eat pineapple that's locally canned close to the source (i.e. the pineapple plots) at its prime ripeness than to eat dodgy "fresh" pineapple that's got huge airmiles clocked up (or shipping miles) after being picked under-ripe on the off-chance that it'll reach optimum ripeness as it arrives on the shelves or market stalls. When we lived in Tanzania the Dabaga Canning Factory was next door to the Concern office in Ipogoro where the most wonderful smells emanated throughout the year, contingent on the seasonality of the crops - this is a prime example of green organic and fairly traded food production and I have a lot of regard for it; you can check out its brochure here.

So give it a try and you won't be disappointed.

Pineapple Upside-Down Cake
(translated from the Dutch by me - hope it's accurate enough!)

Ingredients

  1. 175g/6oz self-raising flour
  2. 200g//7oz sugar
  3. 65g/3oz soft butter/margarine
  4. 1 egg
  5. 1 teasp. vanilla essence or 1 sachet vanilla sugar
  6. pinch salt
  7. 1 can pineapple slices
  8. Whipped Cream or Ice Cream to serve

Method

  1. Grease a Springform Baking Tin
  2. Line with drained Pineapple slices and half-slices as shown in photo
  3. Mix all the other ingredients together to make a smooth semi-stiff batter, more pouring than dropping consistency
  4. Pour the cake batter over the Pineapple slices
  5. Bake in oven pre-heated to 150 degrees Centigrade/300 degrees Fahrenheit for about 40 mins until baked through and golden brown
  6. Cool in tin, then turn out onto serving plate
  7. If you want to glaze it after baking, see Handy Tip below and be sure to use ovenproof plate while browning in oven
  8. Serve slices with Whipped Cream or Ice Cream

Handy Tip

Instead of greasing the Springform baking tin, you could line it with 50g/2oz melted butter with 100g brown sugar dissolved in it. This will caramelise in the baking to give a nice golden-brown glaze.

I forgot to do this at the start but at the end I improvised (in the manner of the best/most forgetful bakers!) by adding the melted butter to the finished cake and sprinkling over the brown sugar and then returning it to the top shelf of the oven for 5-10 mins until the same effect was achieved.

This is delicious with a nice cuppa tea or coffee, and it has a lovely sticky-pudding-y texture which is quite filling (so you shouldn't over-indulge), yet healthy enough to be one of your Five-a-Day (fruit'n'veg) portions if you are seriously guilt-tripping yourself!

Friday, July 23, 2010

Scrummy Savoury Samosas and Chappatis - a Taste of India

I have loved samosas since I first tasted them over 30 years ago when I went to live in Bangladesh, where they are known as shingaras. if the pastry is flaky and samosas if crispy!
The years in Bangladesh were an exotic exciting experience that proved life-changing in more ways than I'd bargained for when I set off on the great adventure. I met hubby in Bangladesh when he came to work there as a volunteer a year after I started my two year stint as a volunteer with the Irish-based NGO Concern, and the rest is history - that was the start of a long involvement with development work and living in extremely interesting places and generally way off the beaten track and far from the tourist trail - even by backpacker standards.

In Tanzania there was a large Indian community throughout the country, mainly Gujerati in origin, so samosas were widely known and wonderful. In Laos, where we also lived, there were not so many Indian restaurants, but the street food there was so delicious you could happily live with what they had to offer - and the local equivalent of spring rolls was comparable - pastry wrapped, deep fried and filled with spicy local meat and/or vegetables.

My introduction to Indian/Bangladeshi food was in at the deep end - food-wise it was an eye-opener and I have never looked back - I really enjoy samosas and have to curb my enthusiasm or my curves would need to be curbed big time! They are treats to be treated as such - occasional snacks or starters, and not something to sit down to when you've a good book on the go and the munchies set in. They are best with mango chutney on the side - as a dipsauce. You could also use sweet chili sauce but it's more Southeast Asian than Subcontinental.

Here's the recipe I use - and there are wonderful samosas locally available in the Farmers' Market, made by a new foodie outfit, Pie in the Sky by Maeve. She has lovely samosas - homemade with filo pastry, which I used in this batch. Our lovely Bangladeshi/Indian Restaurant, Saffron, does lovely samosas with the chappati-type pastry. All are preferable to the frozen or chilled ones you get in party packs at Christmas in the supermarkets.


I have also used Chappati dough rolled thinly and cut in half-circles, then folded over with the filling in the middle, and that is also delicious. In both cases, use sunflower or any vegetable oil, though olive oil might be a tad rich, and deep fry in small quantities in hot oil, dipping in for a minute or so tops. Use a slotted spoon and be careful of spatters. They will cook very quickly so be warned.

I have shown the stages of wrapping in the photos. I hope you give them a go. You will pay about €2 (two Euro) per piece in the market or takeaway, and they are really easy to make once you have the necessary stuff in store.

Peas and Potatoes Samosas.
(You can add unsalted cashew nuts for a more upmarket samosa if you have them, as the book recipe indicates)

Ingredients (makes about 12 large/20 small samosas)
  • 12os/350g. potatoes - peeled and diced

  • 4oz/125g frozen peas

  • 45ml veg. oil

  • 1 onion - peeled and chopped

  • 1 garlic clove - peeled and chopped

  • 1inch/2.5cm ginger piece - peeled and chopped

  • 1tsp garam masala

  • 2tsp curry paste - mild or medium as you like it (I use Patak's or Sharwood's)

  • half teasp. cumin seeds

  • 2tsp lemon juice

Method

  • Boil the potatoes and peas in boiling salted water for 8-10 mins, until potatoes are tender, then drain
  • Heat oil in frying pan
  • Add onion, garlic, ginger, spices, peas and potatoes

  • Stir fry for 2 mins

  • Add lemon juice and cook gently for 2 mins

  • Remove from heat, roughly mash the mix and season with salt/pepper to taste

    Pastry

    Frozen Filo can be used - about half a pack - it's handy if you can handle the thin sheets - that's what you see in the photos I took.
  • Cut into strips about 4 inches/10cm wide X 12inches/30cm long

  • Put the mix on one end of the strip and fold the strip over the mix

  • Then fold it again and again until strip end is reached.

    As it's so thin it has to be folded a number of times to get any substance in it, and it is lovely and crispy. It is probably more calorific as the oil will be trapped in the layers of the pastry.

    Preferably I would use Homemade pastry - like Chappati dough rolled thin. This is more substantial and doesn't have to be layered like the Filo Pastry.

    You can use this for Chappatis and just make dinner-plate size circles from the dough. Then shallow fry in a smidgen of oil for a Paratha-like bread, or if you have a heavy cast-iron griddle pan, do them the trad Indian way with no oil, just browned with char-grilled bits - the real thing and delicious as a wrap or to mop up your rice and dhal.

    Pastry/Chappati Dough
  • 8oz/450g plain flour

  • 2oz/60g butter or 3 tablespoons oil

  • water to mix to stiff dough

  • half teasp. salt

Method

  • Mix all pastry ingredients and knead well until smooth and not sticky

  • Leave for a while to rest

  • Pull off golf-ball size pieces and roll into a ball

  • Using a rolling pin and floured worktop, roll into teaplate size circles, cut in half and place cooked filling on one side of semi-circle
  • Brush edges with water and fold over to seal

  • Deep fry in hot oil until golden brown in heavy-based frying pan (you could use a deep-fat fryer if you have one - I don't and it's not necessary)

  • Drain well on kitchen paper
  • Serve with Mango Chutney and enjoy!

You can eat them cold as a lunchbox snack, or warm them up in the oven. As they are veggie they will keep in the fridge in a covered container, or in the freezer, and you can re-heat them quickly in the oven.


They are also great party snacks. For our New Year's Eve Party the last two years, I made a massive Indian buffet - Beef curry, Chicken curry, two types of Dhal, Basmati Rice, and a mountain of homemade Chappatis, with lots of samosas and onion bhajias and raitas on the side - some day I'll give the details in recipes - way too much information for one post.